Ethical Issues in Healthcare: Key Considerations For AI
Let’s keep it simple. In healthcare, trust, safety, and human dignity come first, no matter what solution you build. The same applies to AI. Today, it is everywhere, from clinics...
Listening is fun too.
Straighten your back and cherish with coffee - PLAY !

In this blog, we will be goingto talk about the globalization and localization in .net core. If you want to make your web application in such a way that can be used for every different culture then you need globalization. Using globalization and localization we can build such a website or application so the user anywhere from global can use it. Globalization supports the different cultures. Localization provide the localized resource and cultures.
A resource file may include a troupe of icons, menus, dialog boxes, strings tables, user-defined binary data and other sorts of items.
If we are working with the globalization and localization then we need to use the resource file.Resource file contains key/value pair string which is specific to the culture. In the output, the code string will be replaced with the value of the specific culture.
Asp.net Core Globalization is the process of developing any web application or mobile application globalized. In globalization, there will be different languages for various geographies.
Localization is the process of making any web applications that behaves depending upon the local culture.
There are three types of localization.
Here we will see View localization and data annotation. For perfect understanding let’s see the example.
Example: -
First of all make a new asp.net core project.
New -> project -> asp.net core web application -> MVC.

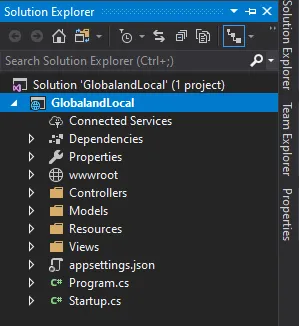
Figure 1.0 Project Structure
After that your project structure looks like this. In above snap we have to just add another folder resources. In which we will place our resource file.
Step 2: -Update the startup file
We need to add this name spaces:
  using System.Globalization;
  using Microsoft.AspNetCore.Localization;
  using Microsoft.Extensions.Options;
Add localization services in the startup file.
services.AddLocalization(options => options.ResourcesPath = "Resources");
  services.AddMvc()
  .AddViewLocalization(LanguageViewLocationExpanderFormat.Suffix)
  .AddDataAnnotationsLocalization(options =>
  {
      options.DataAnnotationLocalizerProvider = (type, factory) =>
  {
    var assemblyName = newAssemblyName(typeof(ApplicationResource).GetTypeInfo().Assembly.FullName);
    return factory.Create("ApplicationResource", assemblyName.Name);
      };
  });
  ervices.Configure(options =>
  {
  var givenCultures = new[]
      {
    new CultureInfo("en"),
    new CultureInfo("fr"),
    new CultureInfo("hi"),
      };
      options.DefaultRequestCulture = new RequestCulture("en");
      options.SupportedCultures = givenCultures;
      options.SupportedUICultures = givenCultures;
});
In add localization, add our resource folder name in resource path. We have named the Resources.
Now configure request localization options. In which we have made the array of cultures or languages.
Make your own default language using default request culture.
Note: -Here “en” means English, “hi” means Hindi, and “fr” means French.
Create the view model and name it “userviewmodel” as shown.
publicclassUserViewModel
  {
      [Display(Name = "FullName")]
publicstring FullName { get; set; }

      [Display(Name = "City")]
publicstring City { get; set; }

      [Display(Name = "MobileNo")]
publicstring MobileNo { get; set; }
  }
Add data annotation “Display Name” for all properties.
And make a resource file in which we have to put this display name in it. We will see it in next step.
Add a new folder Resources in the project.
Right click on the Resources folder and Add -> Add new Item -> Resource file.
Display name of view model and key name should be same in resource file.
Figure 2.0 Resource fileAdd Culture controller to store the value of culture and display in view.
publicclassCultureController : Controller
  {
public IActionResult Index ()
      {
    returnView ();
      }
      [HttpPost]
  Public IActionResult SetLanguage(string culture, string returnUrl)
      {
          Response.Cookies.Append(
          CookieRequestCultureProvider.DefaultCookieName,
          CookieRequestCultureProvider.MakeCookieValue(new RequestCulture(culture)),
    new CookieOptions {Expires = DateTimeOffset.UtcNow.AddYears(1) }
       );
  return LocalRedirect(returnUrl);
      }
 }
Now add set language method to take the value of culture and store it in cookie. We will designate this method from the view. Now make a view of it.
Add user controller that will use the user view model and make view of it.
publicclassUserController : Controller
  {
public IActionResult Index()
  {
  return View();
  }
}
Initially add the partial view which will display the culture dropdown from which we can select the languages. Place this view in the shared folder and place below code.
@using Microsoft.AspNetCore.Builder @using Microsoft.AspNetCore.Localization @using Microsoft.AspNetCore.Mvc.Localization @using Microsoft.Extensions.Options @inject IViewLocalizer Localizer @inject IOptionsLocOptions @{ var Culture = Context.Features.Get (); var Items = LocOptions.Value.SupportedUICultures .Select(c => new SelectListItem { Value = c.Name, Text = c.DisplayName }) .ToList(); }
Add some namespaces. And add this partial view in the layout view.
View of User controller
@model GlobalandLocal.Models.UserViewModel
@using Microsoft.AspNetCore.Mvc.Localization
@inject IViewLocalizer ViewLocalizer
@{
  ViewData["Title"] = "Index";
}
Back to List
Figure 3.0 Output
We have seen the localization using Data annotation. Now have a look at the view localization.
Now for view localization we have to just make a resource file and inject the IView localizer in the view.
Now make a view of user’s index method as we created earlier. Now create the resource file of that index method as shown below.
Note: - Name should be same either it will not be executed.
Figure 4.0 View localizerIn index view just add this code below the injector.
@model GlobalandLocal.Models.UserViewModel

@using Microsoft.AspNetCore.Mvc.Localization
@inject IViewLocalizer ViewLocalizer
@{
  ViewData["Title"] = "Index";
}
And other code will be same. Now run it.
In the view localizer we have to just inject IView localizer and display the culture string whatever we want put in the “@ViewLocalizer [“string”]”. Just take care of the name, which we used in the bracket,and the name in the resource file must be same.
Now we have seen the simple methods to make our web site or application globalized.
We have seen a code of globalization and localization using resource files. In the latest version, you can now use the globalization and localization using the JSON file also will be beneficial for the developer. Globalization supports input, display, and output. Where localization is the further process of globalization which is used for local culture.

Let’s keep it simple. In healthcare, trust, safety, and human dignity come first, no matter what solution you build. The same applies to AI. Today, it is everywhere, from clinics...

Let's keep it real. The whole point of building autonomous Agents is to cut manual work and keep focus on business. Approvals that used to take days can happen in hours because...

Remember our last guide - Power BI forecasting? It revealed things that truly blocks accuracy, both structural and situational. Now it's time to take the next step. Knowing Power...