×

iFour Logo

How to perform Repository pattern in ASP.NET MVC?

Kapil Panchal - October 27, 2020

Listening is fun too.

Straighten your back and cherish with coffee - PLAY !

  • play
  • pause
  • pause
How to perform Repository pattern in ASP.NET MVC?

What is a Repository pattern?


The Repository pattern is the most popular pattern for creating an enterprise level application. The repository is used to create an abstraction layer between the data access layer and the business logic layer of an application.Implementation of repository patterns can help to abstract your application from changes in the data store and can facilitate automated unit testing.

Repository directly communicates with Database (Data Access Layer (DAL)) andfetch the data and provide it to the logical layer (Business logic layer (BAL)). The purpose of the Repository is to isolate the data access layer (DAL) and the Business Logic Layer (BAL). Instead of writing entire data access logic in a controller write this logic in a different class known as a repository. This will make your code maintainable and understandable.

If an application doesn't follow the repository pattern then an application has the following problems:


  • The application has a duplicate database code.
  • For testing database operation and business logic User Interface (UI) required.
  • For unit test business logic external dependencies are needed.
  • Implementation of database caching is difficult.

Using the Repository pattern has the following advantages:


  • Database access logic is centrally managed and can be reused.
  • Business entities strongly type.
  • The repository pattern implements an isolation layer for data access logic and can be unit tested without data access logic.

Why the repository pattern is used?


The main purpose of the repository pattern is to isolate the data access layer and business logic.In Asp.Net MVC model is used to interact with the Data Access layer and Controller for performing Data access operation. The controller is responsible for passing data to the view. If the controller has tightly coupled to mode then any model changes directly impact on the controller and also on View.

Repository pattern process flow


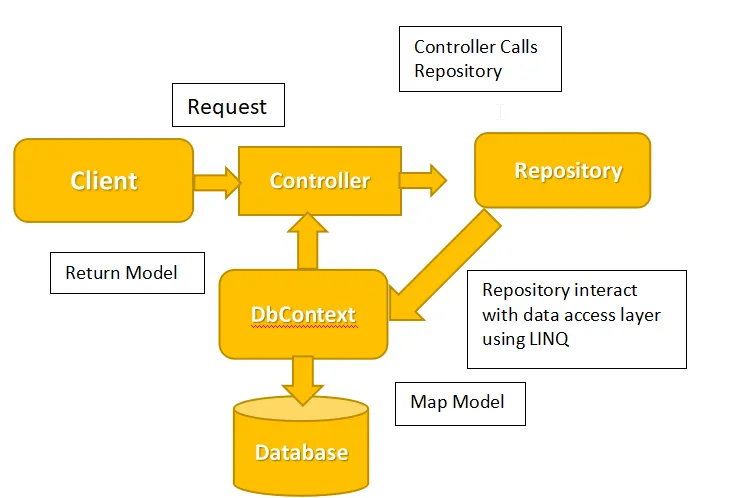
The following diagram gives an overview of the repository pattern:

process_flow_diagram


1.1-Process Flow Diagram


  • Client business logic (IIS/web server) Request controller for read and write operations.
  • The controller interacts with the repository to load the model based on the call.
  • The controller uses Dependency Injection to call the repository method.
  • Repository Interact with Database using Dbcontext and return the model to the controller.

Want to build an amazing UI for your business application? Hire Dot NET Developer from us right now.

How to use a repository pattern in ASP.NET MVC?


Step 1: Create web application

Open Visual Studio

Create new project

 
  • File->New->Project->web->Asp.Net web Application (.Net framework)

Provide name and Location and Click on next.

Select the Basic template (MVC) and Click on ok.

Step 2: Create a table

Open Microsoft SQL server management studio.

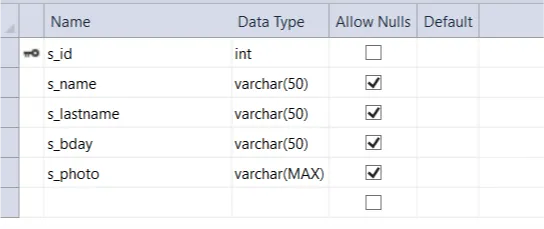
Select the Database and Create a table.

Picture1_establish


1.2 student table


Step 3: Connect with the database with (Db First Approach).

Open solution explorer and Add new Data Model.

  • Add->New Item->Data->Ado.net Data Entity Model.

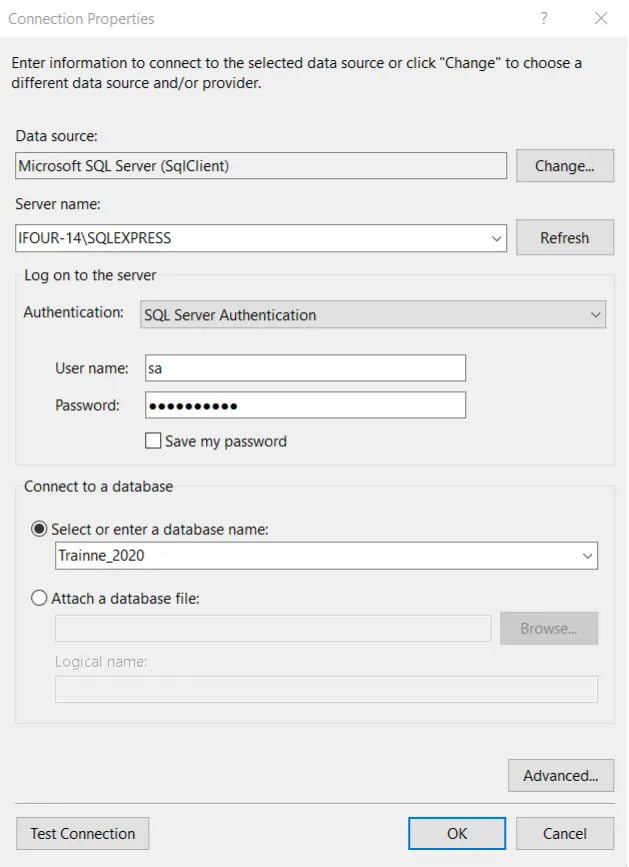
Connect with the database and add a table.

  • EF Designer from database->Add properties->Select table->Connect


1.3 Establish Connection for SQL server.


Need to hire AngularJS developer for your business?

Step 4: Create a Repository for Employee

Create Repository folder inside the project

 
  • Create a Repository and Interface inside the Repository folder.

IStudentRepository.cs

 
usingSystem.Collections.Generic;
namespaceRepository.Models
{
publicinterfaceIStudentRepository
{
IEnumerableGetStudents();
student GetStudentById(ints_id);
voidInsertStudent(student s);
voidUpdateStudent(student s);
voidDeleteStudent(ints_id);
voidsave();
}
}

StudentRepository.cs

StudentRepositoryimplementsIStudentRepository

using System;
usingSystem.Collections.Generic;
usingSystem.Linq;
namespaceRepository.Models
{
publicclassStudentRepository :IStudentRepository
{
private demoEntities2 _context;
publicStudentRepository(demoEntities2 context)
{
this._context = context;
}
publicIEnumerableGetStudents()
{
return _context.students.ToList();
}
public student GetStudentById(ints_id)
{
return _context.students.Find(s_id);
}
publicvoidInsertStudent(student s)
{
_context.students.Add(s);
}
publicvoidUpdateStudent(student s)
{
_context.Entry(s).State = System.Data.Entity.EntityState.Modified;
}
publicvoidDeleteStudent(ints_id)
{
student s = _context.students.Find(s_id);
_context.students.Remove(s);
}
publicvoidsave()
{
_context.SaveChanges();
}
publicvoidDispose()
{
thrownewNotImplementedException()
}
}
}

Step 5: Call Repository from Controller.

Add new controller

  • Add->new Item->Controller->MVC5-Controller Empty

Controller Interact with StudentRepository by creating Reference of IStudentRepository

StudentController.cs

 
usingDemo.Models;
usingSystem.Linq;
usingSystem.Web.Mvc;
namespaceDemo.Controllers
{
publicclassStudentController : Controller
{
// GET: Student
privateIStudentRepositoryinterfaceobj;
publicStudentController()
{
this.interfaceobj = newStudentRepository(new demoEntities2());
}
// GET: Student
publicActionResultIndex()
{
var data = from m ininterfaceobj.GetStudents() select m;
return View(data);
}
publicActionResultDetailStudent(int id)
{
student s = interfaceobj.GetStudentById(id);
return View(s);
}
publicActionResultCreateStudent()
{
returnView();
}
[HttpPost]
publicActionResultCreateStudent(student s)
{
interfaceobj.InsertStudent(s);
interfaceobj.save();
returnRedirectToAction("Index");
}
publicActionResultUpdateStudent(int id)
{
student s = interfaceobj.GetStudentById(id);
return View(s);
}
[HttpPost]
publicActionResultUpdateStudent(int id, student s)
{
interfaceobj.UpdateStudent(s);
interfaceobj.save();
returnRedirectToAction("Index");
}
publicActionResultDeleteStudent(int id)
{
student s = interfaceobj.GetStudentById(id);
return View(s);
}
[HttpPost]
publicActionResultDeleteStudent(int id, student s)
{
interfaceobj.DeleteStudent(id);
interfaceobj.save();
returnRedirectToAction("Index");
}
}
}

Planning to Hire an ASP.Net Web Development Company? Your Search ends here.


Step 5: Add View.


Add View for Index, CreateStudent, DetailStudent, DeleteStudent


Index.cs

@model IEnumerable
@{
ViewBag.Title = "Index";
}

Index

@Html.ActionLink("Create New", "CreateStudent")

@foreach (var item in Model) { }
 
  @Html.DisplayNameFor(model => model.s_id)  @Html.DisplayNameFor(model => model.s_name)  @Html.DisplayNameFor(model => model.s_lastname)  @Html.DisplayNameFor(model => model.s_bday)   
  @Html.DisplayFor(modelItem => item.s_id)  @Html.DisplayFor(modelItem => item.s_name)  @Html.DisplayFor(modelItem => item.s_lastname)  @Html.DisplayFor(modelItem => item.s_bday)  @Html.ActionLink("Edit", "UpdateStudent", new { id=item.s_id }) | @Html.ActionLink("Details", "DetailStudent", new { id=item.s_id }) | @Html.ActionLink("Delete", "DeleteStudent", new { id=item.s_id }) 


CreateStudent.cs


@model Demo.Models.student
@{
ViewBag.Title = "CreateStudent";
}

CreateStudent

@using (Html.BeginForm()) { @Html.AntiForgeryToken()

student


@Html.LabelFor(model =>model.s_name, htmlAttributes: new { @class = "control-label col-md-2" }) @Html.EditorFor(model =>model.s_name, new { htmlAttributes = new { @class = "form-control" } }) @Html.LabelFor(model =>model.s_lastname, htmlAttributes: new { @class = "control-label col-md-2" }) @Html.EditorFor(model =>model.s_lastname, new { htmlAttributes = new { @class = "form-control" } }) @Html.LabelFor(model =>model.s_bday, htmlAttributes: new { @class = "control-label col-md-2" }) @Html.EditorFor(model =>model.s_bday, new { htmlAttributes = new { @class = "form-control" } }) }
@Html.ActionLink("Back to List", "Index")
@section Scripts { @Scripts.Render("~/bundles/jqueryval") }
 

note:

Asp.net MVC provide Template [List, add, edit, delete] for View. For adding View Right Click on the method and Add View. Select Template and add Model class.

In RouteConfig.cs file change the name of controller [Home->Student]

Step 7: Build and Run Project

Build and Run the application.

Picture_student_view_page

1.4 Student View page

Looking to build secure applications for your business? Hire ethereum blockchain developer from us right now.

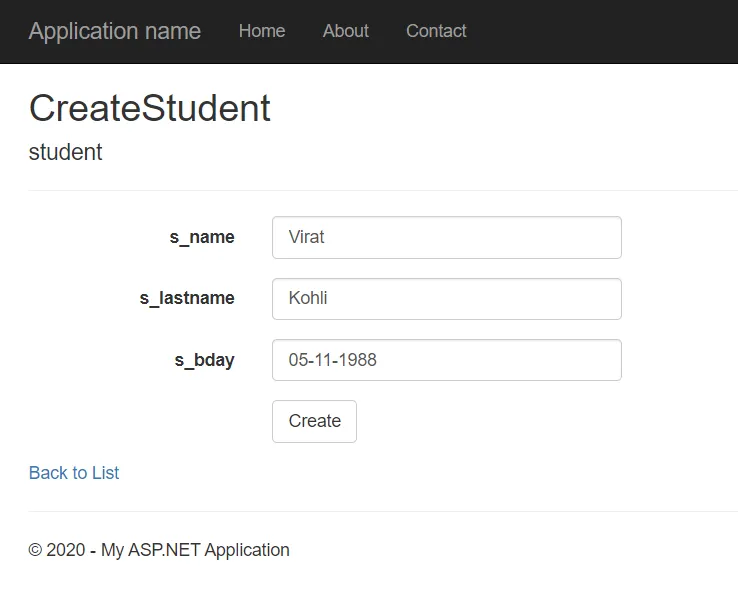
Picture_student_add_page

1.5 Student Add page

Conclusion:


A repository pattern is a popular pattern for creating a web application. Repository pattern isolates Data-access Layer and Business Logic layer. So, users can easily manage Business logic without worrying about the database. By implementing repository users can unit testtheir application.

How to perform Repository pattern in ASP.NET MVC? Table of Content 1. What is a Repository pattern? 2. Why the repository pattern is used? 3. Repository pattern process flow 4. How to use a repository pattern in ASP.NET MVC? 5. Conclusion What is a Repository pattern? The Repository pattern is the most popular pattern for creating an enterprise level application. The repository is used to create an abstraction layer between the data access layer and the business logic layer of an application.Implementation of repository patterns can help to abstract your application from changes in the data store and can facilitate automated unit testing. Repository directly communicates with Database (Data Access Layer (DAL)) andfetch the data and provide it to the logical layer (Business logic layer (BAL)). The purpose of the Repository is to isolate the data access layer (DAL) and the Business Logic Layer (BAL). Instead of writing entire data access logic in a controller write this logic in a different class known as a repository. This will make your code maintainable and understandable. If an application doesn't follow the repository pattern then an application has the following problems:   The application has a duplicate database code. For testing database operation and business logic User Interface (UI) required. For unit test business logic external dependencies are needed. Implementation of database caching is difficult. Using the Repository pattern has the following advantages:   Database access logic is centrally managed and can be reused. Business entities strongly type. The repository pattern implements an isolation layer for data access logic and can be unit tested without data access logic. Why the repository pattern is used? The main purpose of the repository pattern is to isolate the data access layer and business logic.In Asp.Net MVC model is used to interact with the Data Access layer and Controller for performing Data access operation. The controller is responsible for passing data to the view. If the controller has tightly coupled to mode then any model changes directly impact on the controller and also on View. Read More: An Overview Of New Features Of Mvc 6 For Mvc Software Companies Repository pattern process flow The following diagram gives an overview of the repository pattern:   1.1-Process Flow Diagram     Client business logic (IIS/web server) Request controller for read and write operations. The controller interacts with the repository to load the model based on the call. The controller uses Dependency Injection to call the repository method. Repository Interact with Database using Dbcontext and return the model to the controller. Want to build an amazing UI for your business application? Hire Dot NET Developer from us right now. Contact us How to use a repository pattern in ASP.NET MVC? Step 1: Create web application Open Visual Studio Create new project   File->New->Project->web->Asp.Net web Application (.Net framework) Provide name and Location and Click on next. Select the Basic template (MVC) and Click on ok. Step 2: Create a table Open Microsoft SQL server management studio. Select the Database and Create a table.   1.2 student table   Step 3: Connect with the database with (Db First Approach). Open solution explorer and Add new Data Model. Add->New Item->Data->Ado.net Data Entity Model. Connect with the database and add a table. EF Designer from database->Add properties->Select table->Connect   1.3 Establish Connection for SQL server.   Need to hire AngularJS developer for your business? Connect us now Step 4: Create a Repository for Employee Create Repository folder inside the project   Create a Repository and Interface inside the Repository folder. IStudentRepository.cs   usingSystem.Collections.Generic; namespaceRepository.Models { publicinterfaceIStudentRepository { IEnumerableGetStudents(); student GetStudentById(ints_id); voidInsertStudent(student s); voidUpdateStudent(student s); voidDeleteStudent(ints_id); voidsave(); } } StudentRepository.cs StudentRepositoryimplementsIStudentRepository using System; usingSystem.Collections.Generic; usingSystem.Linq; namespaceRepository.Models { publicclassStudentRepository :IStudentRepository { private demoEntities2 _context; publicStudentRepository(demoEntities2 context) { this._context = context; } publicIEnumerableGetStudents() { return _context.students.ToList(); } public student GetStudentById(ints_id) { return _context.students.Find(s_id); } publicvoidInsertStudent(student s) { _context.students.Add(s); } publicvoidUpdateStudent(student s) { _context.Entry(s).State = System.Data.Entity.EntityState.Modified; } publicvoidDeleteStudent(ints_id) { student s = _context.students.Find(s_id); _context.students.Remove(s); } publicvoidsave() { _context.SaveChanges(); } publicvoidDispose() { thrownewNotImplementedException() } } } Step 5: Call Repository from Controller. Add new controller Add->new Item->Controller->MVC5-Controller Empty Controller Interact with StudentRepository by creating Reference of IStudentRepository StudentController.cs   usingDemo.Models; usingSystem.Linq; usingSystem.Web.Mvc; namespaceDemo.Controllers { publicclassStudentController : Controller { // GET: Student privateIStudentRepositoryinterfaceobj; publicStudentController() { this.interfaceobj = newStudentRepository(new demoEntities2()); } // GET: Student publicActionResultIndex() { var data = from m ininterfaceobj.GetStudents() select m; return View(data); } publicActionResultDetailStudent(int id) { student s = interfaceobj.GetStudentById(id); return View(s); } publicActionResultCreateStudent() { returnView(); } [HttpPost] publicActionResultCreateStudent(student s) { interfaceobj.InsertStudent(s); interfaceobj.save(); returnRedirectToAction("Index"); } publicActionResultUpdateStudent(int id) { student s = interfaceobj.GetStudentById(id); return View(s); } [HttpPost] publicActionResultUpdateStudent(int id, student s) { interfaceobj.UpdateStudent(s); interfaceobj.save(); returnRedirectToAction("Index"); } publicActionResultDeleteStudent(int id) { student s = interfaceobj.GetStudentById(id); return View(s); } [HttpPost] publicActionResultDeleteStudent(int id, student s) { interfaceobj.DeleteStudent(id); interfaceobj.save(); returnRedirectToAction("Index"); } } } Planning to Hire an ASP.Net Web Development Company? Your Search ends here. Contact us   Step 5: Add View.   Add View for Index, CreateStudent, DetailStudent, DeleteStudent   Index.cs @model IEnumerable @{ ViewBag.Title = "Index"; }Index @Html.ActionLink("Create New", "CreateStudent") @foreach (var item in Model) { }    @Html.DisplayNameFor(model => model.s_id)  @Html.DisplayNameFor(model => model.s_name)  @Html.DisplayNameFor(model => model.s_lastname)  @Html.DisplayNameFor(model => model.s_bday)     @Html.DisplayFor(modelItem => item.s_id)  @Html.DisplayFor(modelItem => item.s_name)  @Html.DisplayFor(modelItem => item.s_lastname)  @Html.DisplayFor(modelItem => item.s_bday)  @Html.ActionLink("Edit", "UpdateStudent", new { id=item.s_id }) | @Html.ActionLink("Details", "DetailStudent", new { id=item.s_id }) | @Html.ActionLink("Delete", "DeleteStudent", new { id=item.s_id })    CreateStudent.cs @model Demo.Models.student @{ ViewBag.Title = "CreateStudent"; }CreateStudent @using (Html.BeginForm()) { @Html.AntiForgeryToken() student @Html.LabelFor(model =>model.s_name, htmlAttributes: new { @class = "control-label col-md-2" }) @Html.EditorFor(model =>model.s_name, new { htmlAttributes = new { @class = "form-control" } }) @Html.LabelFor(model =>model.s_lastname, htmlAttributes: new { @class = "control-label col-md-2" }) @Html.EditorFor(model =>model.s_lastname, new { htmlAttributes = new { @class = "form-control" } }) @Html.LabelFor(model =>model.s_bday, htmlAttributes: new { @class = "control-label col-md-2" }) @Html.EditorFor(model =>model.s_bday, new { htmlAttributes = new { @class = "form-control" } }) } @Html.ActionLink("Back to List", "Index") @section Scripts { @Scripts.Render("~/bundles/jqueryval") }   note: Asp.net MVC provide Template [List, add, edit, delete] for View. For adding View Right Click on the method and Add View. Select Template and add Model class. In RouteConfig.cs file change the name of controller [Home->Student] Step 7: Build and Run Project Build and Run the application. 1.4 Student View page Looking to build secure applications for your business? Hire ethereum blockchain developer from us right now. Contact us 1.5 Student Add page Conclusion: A repository pattern is a popular pattern for creating a web application. Repository pattern isolates Data-access Layer and Business Logic layer. So, users can easily manage Business logic without worrying about the database. By implementing repository users can unit testtheir application.

Build Your Agile Team

Enter your e-mail address Please enter valid e-mail

Categories

Ensure your sustainable growth with our team

Talk to our experts
Sustainable
Sustainable
 

Blog Our insights

React 19 For Business: Latest Features and Updates

When I first started exploring React.js for my company’s needs, I felt a bit lost. It was like trying to solve a big puzzle without all the pieces! But as I kept learning and trying them practically, I discovered some really cool features that blew my mind making everything seamlessly easier.

MySQL vs Azure SQL Database: Cost, Security, and Compatibility Considerations

This blog is a continuation of MySQL vs Azure SQL Database – Part 1 , where we compared MySQL and Azure SQL databases. We learned how important it is to identify and evaluate client...

Is It Worth Using Azure With Power Platforms For Financial Business?

The era of traditional software development is fading; Azure Cloud and Power Platform services are taking charge to run businesses of the new age. When it comes to Financial business,...