×

iFour Logo

How to use HttpClient in ASP.NET MVC to consume an ASP.NET Web API REST service?

Kapil Panchal - August 26, 2021

Listening is fun too.

Straighten your back and cherish with coffee - PLAY !

  • play
  • pause
  • pause
How to use HttpClient in ASP.NET MVC to consume an ASP.NET Web API REST service?

Ang What is REST Services?


REST services stand for Representational State Transfer. It is a lightweight, scalable and maintainable service that is built on REST architecture which is used to access and manipulate the resources identified through URL.

Want to build impressive application for your business? Connect us right now to hire dedicated React developer.

Prerequisites


To consuming Web API REST services first you need to create a Web API REST service and then publish and host the web service on the IIS server you created. After hosting the web service then consuming this API in the client application.

After creating and hosting web API Now we start consuming Web API REST service in our ASP.NET MVC application step by step.

Create MVC Application


Open Microsoft Visual studio. Click on File followed by NEW, then click on the project, select ASP.NET web application, give an appropriate name and click OK.

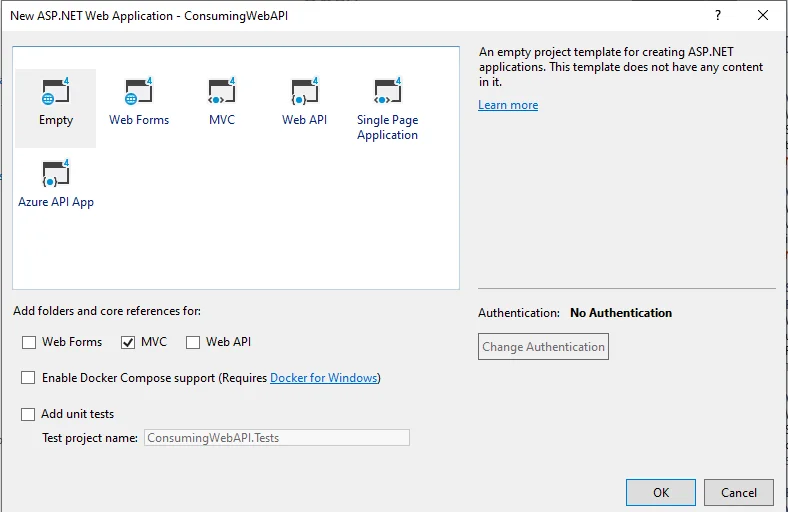
After clicking OK, the following window will appear. select Empty and MVC Options then click OK.

Empty_MVC_Application

[Empty MVC Application]

This step creates the simple ASP.NET MVC application without any controller and view. This is how your project should be like in solution Explore.

[Project Structure]

[Project Structure]

Now we need to Install the HttpClient library from NuGet

We use the HttpClient to consume our Hosted Web API REST service. So for this, we need to install the HttpClient library from NuGet Package Manager.

Right-click on the Application name and click on Manage NuGet Package.

What is HttpClient?

HttpClient class provide a base class that is used to send HTTP request and receive HTTP response resources.

HttpClient sends and receives data from Web API URL which is hosted on the local IIS server.HttpClient can process multiple requests concurrently.

[Install HttpClient Library]

[Install HttpClient Library]

Search System.Net.Http and click on the install button. It will be taking few seconds for installing this Library.

Now we need to Install WebAPI.Client library from NuGet

Search Microsoft.AspNet.WebApi.client and click on the install button. It will be taking few seconds for installing this Library. We need to install all necessary packages to consume Web API REST services in our application.

[Install WebApi client Library]


[Install WebApi client Library]

Now, we have installed all the necessary packages require to consume Web API REST services in web applications.

Looking to build an outstanding software for your business? Hire dedicated Java developers from us right away.

Create Model Class

Now, we need to create a model class inside the model folder. Right-click on the Model folder and add a class named Employee. cs.

Employee.cs file

using System;
using System.Collections.Generic;
using System.Linq;
using System.Web;
namespace ConsumingWebAPI.Models
{
public class Employee
{
public int Id { get; set; }
public string Name { get; set; }
public string city { get; set; }
public string EmailID { get; set; }
public long Salary { get; set; }
}
}
               

Right-click on the controller folder, click on Add and select controller. select the Empty template from the controller list and give the appropriate name to the controller.

[Empty Controller]


[Empty Controller]

In my hosted web API RESET services, I have included two methods, as given below

  • GetAllEmployee
  • GetEmployeeById

GetAllEmployee method handles HttpGET.GetEmployeeById handles HttpPOST this method takes employee id as a parameter in the method.

In the controller method, we are going to call the GetAllEmployee method that returns all the details employee, my hosted web API REST service base URL is http://192.168.45.1:6350/ and call the methods as per your requirement specified from our hosted web API REST services. This URL be a base URL after the URL it will be the API controller name and API method same as the following.

http://192.168.45.1:6350/api/Employees/GetAllEmployee

In the preceding URL

  • http://localhost:51910 This is the base address of my web API, It will be different as per your server.
  • API It is then used to differentiate between an MVC controller request Web API controller request.
  • Employees are the controller name of Web API.
  • GetAllEmployee is the Web API method that returns the list of all employees.
  • GetEmployeeById is the web API method that returns a record of an employee using employee id

Searching for Reliable.Net Development Company ?

Add the following code inside the controller.

EmployeeController

using ConsumingWebAPI.Models;
using Newtonsoft.Json;
using System;
using System.Collections.Generic;
using System.Linq;
using System.Net.Http;
using System.Net.Http.Headers;
using System.Threading.Tasks;
using System.Web;
using System.Web.Mvc;
namespace ConsumingWebAPI.Controllers
{
public class EmployeeController: Controller
{
string Baseurl = "http://192.168.95.1:5555/";
public async Task Index()
{
List EmpInfo = new List();
using (var client = new HttpClient())
{
client.BaseAddress = new Uri(Baseurl);
client.DefaultRequestHeaders.Clear();
HttpResponseMessage Res = await client.GetAsync("api/Employee/GetAllEmployees");
if (Res.IsSuccessStatusCode)
{
var EmpResponse = Res.Content.ReadAsStringAsync().Result;
EmpInfo = JsonConvert.DeserializeObject>(EmpResponse);
}
return View(EmpInfo);
}
}
public async Task Details()
{
List EmpDetails = new List();
using (var client = new HttpClient())
{
client.BaseAddress = new Uri(Baseurl);
client.DefaultRequestHeaders.Clear();
client.DefaultRequestHeaders.Accept.Add(new MediaTypeWithQualityHeaderValue("application/json"));
HttpResponseMessage Res = await client.GetAsync("api/Employee/GetEmployeeById");
if (Res.IsSuccessStatusCode)
{
var record = Res.Content.ReadAsStringAsync().Result;
EmpDetails = JsonConvert.DeserializeObject>(record);
}
return View(EmpDetails);
}
}
}
}
				 

Create View

Now, we need to create a view. Right-click on the index method, click on Add view and give the name for it then select model class for the view. Select list in the template, it will create the required index view.

Planning to hire Angular programmerfor your business project?

Index.cshtml

@model IEnumerable
@{
ViewBag.Title = "Index";
}

Index

@Html.ActionLink("Create New", "Create")

@foreach (var item in Model) { }
 
  @Html.DisplayNameFor(model => model.Name)  @Html.DisplayNameFor(model => model.city)  @Html.DisplayNameFor(model => model.EmailID)  @Html.DisplayNameFor(model => model.Salary)   
  @Html.DisplayFor(modelItem => item.Name)  @Html.DisplayFor(modelItem => item.city)  @Html.DisplayFor(modelItem => item.EmailID)  @Html.DisplayFor(modelItem => item.Salary) 

we create a detailed view for getting employees using id.

Detail.cshtml


@model ConsumingWebAPI.Models.Employee
@{
ViewBag.Title = "Details";
}

Details

Employee


@Html.DisplayNameFor(model => model.Name)
 
@Html.DisplayFor(model => model.Name)
 
@Html.DisplayNameFor(model => model.city)
 
@Html.DisplayFor(model => model.city)
 
@Html.DisplayNameFor(model => model.EmailID)
 
@Html.DisplayFor(model => model.EmailID)
 
@Html.DisplayNameFor(model => model.Salary)
 
@Html.DisplayFor(model => model.Salary)
 

@Html.ActionLink("Back to List", "Index")

We have done all the coding.

Now, run the application and you can observe the expected result.

Conclusion


Here in this blog, we have learned how to consume REST Web API Services using HttpClient step by step using Asp.Net MVC. This helps you to comprehend REST API services, and how it is hosted before consuming services for the application.

How to use HttpClient in ASP.NET MVC to consume an ASP.NET Web API REST service? Table of Content 1. What is REST Services? 2. Prerequisites 3. Create MVC Application 4. Conclusion Ang What is REST Services? REST services stand for Representational State Transfer. It is a lightweight, scalable and maintainable service that is built on REST architecture which is used to access and manipulate the resources identified through URL. Want to build impressive application for your business? Connect us right now to hire dedicated React developer. Click to hire Prerequisites To consuming Web API REST services first you need to create a Web API REST service and then publish and host the web service on the IIS server you created. After hosting the web service then consuming this API in the client application. After creating and hosting web API Now we start consuming Web API REST service in our ASP.NET MVC application step by step. Create MVC Application Open Microsoft Visual studio. Click on File followed by NEW, then click on the project, select ASP.NET web application, give an appropriate name and click OK. After clicking OK, the following window will appear. select Empty and MVC Options then click OK. [Empty MVC Application] This step creates the simple ASP.NET MVC application without any controller and view. This is how your project should be like in solution Explore. [Project Structure] Now we need to Install the HttpClient library from NuGet We use the HttpClient to consume our Hosted Web API REST service. So for this, we need to install the HttpClient library from NuGet Package Manager. Right-click on the Application name and click on Manage NuGet Package. Read More: Building A Restful Api In Asp.net Mvc 5 What is HttpClient? HttpClient class provide a base class that is used to send HTTP request and receive HTTP response resources. HttpClient sends and receives data from Web API URL which is hosted on the local IIS server.HttpClient can process multiple requests concurrently. [Install HttpClient Library] Search System.Net.Http and click on the install button. It will be taking few seconds for installing this Library. Now we need to Install WebAPI.Client library from NuGet Search Microsoft.AspNet.WebApi.client and click on the install button. It will be taking few seconds for installing this Library. We need to install all necessary packages to consume Web API REST services in our application.   [Install WebApi client Library] Now, we have installed all the necessary packages require to consume Web API REST services in web applications. Looking to build an outstanding software for your business? Hire dedicated Java developers from us right away. Contact us Now Create Model Class Now, we need to create a model class inside the model folder. Right-click on the Model folder and add a class named Employee. cs. Employee.cs file using System; using System.Collections.Generic; using System.Linq; using System.Web; namespace ConsumingWebAPI.Models { public class Employee { public int Id { get; set; } public string Name { get; set; } public string city { get; set; } public string EmailID { get; set; } public long Salary { get; set; } } } Right-click on the controller folder, click on Add and select controller. select the Empty template from the controller list and give the appropriate name to the controller.         [Empty Controller] In my hosted web API RESET services, I have included two methods, as given below GetAllEmployee GetEmployeeById GetAllEmployee method handles HttpGET.GetEmployeeById handles HttpPOST this method takes employee id as a parameter in the method. In the controller method, we are going to call the GetAllEmployee method that returns all the details employee, my hosted web API REST service base URL is http://192.168.45.1:6350/ and call the methods as per your requirement specified from our hosted web API REST services. This URL be a base URL after the URL it will be the API controller name and API method same as the following. http://192.168.45.1:6350/api/Employees/GetAllEmployee In the preceding URL http://localhost:51910 This is the base address of my web API, It will be different as per your server. API It is then used to differentiate between an MVC controller request Web API controller request. Employees are the controller name of Web API. GetAllEmployee is the Web API method that returns the list of all employees. GetEmployeeById is the web API method that returns a record of an employee using employee id Searching for Reliable.Net Development Company ? CONTACT US Add the following code inside the controller. EmployeeController using ConsumingWebAPI.Models; using Newtonsoft.Json; using System; using System.Collections.Generic; using System.Linq; using System.Net.Http; using System.Net.Http.Headers; using System.Threading.Tasks; using System.Web; using System.Web.Mvc; namespace ConsumingWebAPI.Controllers { public class EmployeeController: Controller { string Baseurl = "http://192.168.95.1:5555/"; public async Task Index() { List EmpInfo = new List(); using (var client = new HttpClient()) { client.BaseAddress = new Uri(Baseurl); client.DefaultRequestHeaders.Clear(); HttpResponseMessage Res = await client.GetAsync("api/Employee/GetAllEmployees"); if (Res.IsSuccessStatusCode) { var EmpResponse = Res.Content.ReadAsStringAsync().Result; EmpInfo = JsonConvert.DeserializeObject>(EmpResponse); } return View(EmpInfo); } } public async Task Details() { List EmpDetails = new List(); using (var client = new HttpClient()) { client.BaseAddress = new Uri(Baseurl); client.DefaultRequestHeaders.Clear(); client.DefaultRequestHeaders.Accept.Add(new MediaTypeWithQualityHeaderValue("application/json")); HttpResponseMessage Res = await client.GetAsync("api/Employee/GetEmployeeById"); if (Res.IsSuccessStatusCode) { var record = Res.Content.ReadAsStringAsync().Result; EmpDetails = JsonConvert.DeserializeObject>(record); } return View(EmpDetails); } } } } Create View Now, we need to create a view. Right-click on the index method, click on Add view and give the name for it then select model class for the view. Select list in the template, it will create the required index view. Planning to hire Angular programmerfor your business project? Contact us Now Index.cshtml @model IEnumerable @{ ViewBag.Title = "Index"; }Index @Html.ActionLink("Create New", "Create") @foreach (var item in Model) { }    @Html.DisplayNameFor(model => model.Name)  @Html.DisplayNameFor(model => model.city)  @Html.DisplayNameFor(model => model.EmailID)  @Html.DisplayNameFor(model => model.Salary)     @Html.DisplayFor(modelItem => item.Name)  @Html.DisplayFor(modelItem => item.city)  @Html.DisplayFor(modelItem => item.EmailID)  @Html.DisplayFor(modelItem => item.Salary)  we create a detailed view for getting employees using id. Detail.cshtml @model ConsumingWebAPI.Models.Employee @{ ViewBag.Title = "Details"; }Details Employee  @Html.DisplayNameFor(model => model.Name) @Html.DisplayFor(model => model.Name) @Html.DisplayNameFor(model => model.city) @Html.DisplayFor(model => model.city) @Html.DisplayNameFor(model => model.EmailID) @Html.DisplayFor(model => model.EmailID) @Html.DisplayNameFor(model => model.Salary) @Html.DisplayFor(model => model.Salary)  @Html.ActionLink("Back to List", "Index") We have done all the coding. Now, run the application and you can observe the expected result. Conclusion Here in this blog, we have learned how to consume REST Web API Services using HttpClient step by step using Asp.Net MVC. This helps you to comprehend REST API services, and how it is hosted before consuming services for the application.

Build Your Agile Team

Enter your e-mail address Please enter valid e-mail

Categories

Ensure your sustainable growth with our team

Talk to our experts
Sustainable
Sustainable
 

Blog Our insights

Power Apps vs Power Automate: When to Use What?

I often see people asking questions like “Is Power App the same as Power Automate?”. “Are they interchangeable or have their own purpose?”. We first need to clear up this confusion...

Azure DevOps Pipeline Deployment for Competitive Business: The Winning Formula

We always hear about how important it is to be competitive and stand out in the market. But as an entrepreneur, how would you truly set your business apart? Is there any way to do...

React 18 Vs React 19: Key Differences To Know For 2024

Ever wondered how a simple technology can spark a revolution in the IT business? Just look at React.js - a leading Front-end JS library released in 2013, has made it possible. Praised for its seamless features, React.js has altered the way of bespoke app development with its latest versions released periodically. React.js is known for building interactive user interfaces and has been evolving rapidly to meet the demands of modern web development. Thus, businesses lean to hire dedicated React.js developers for their projects. React.js 19 is the latest version released and people are loving its amazing features impelling them for its adoption.