×

iFour Logo

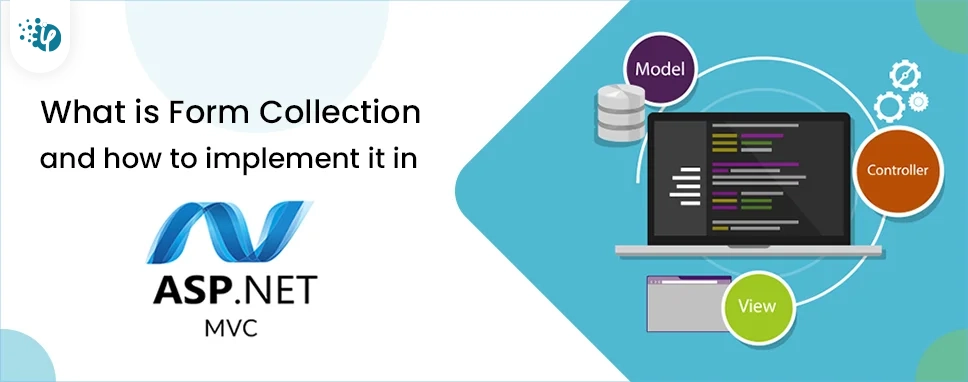
What is Form Collection and how to implement it in ASP .NET MVC?

Kapil Panchal - June 30, 2021

Listening is fun too.

Straighten your back and cherish with coffee - PLAY !

  • play
  • pause
  • pause
What is Form Collection and how to implement it in ASP .NET MVC?

What is Form Collection?


Form collection is used to retrieve input elements from the controller action method. Form collection class automatically receives the data form value in controller methods in the form of key/value pair. Key and value pairs are accessed using the key name and index value.

How to Implement form collection in ASP.NET MVC?


Here in this article, I will show you how to use form collection and how we can use form collection class.

Here I will create the view to enter data into a database table using the form collection class available in ASP.NET MVC.


STEP 1

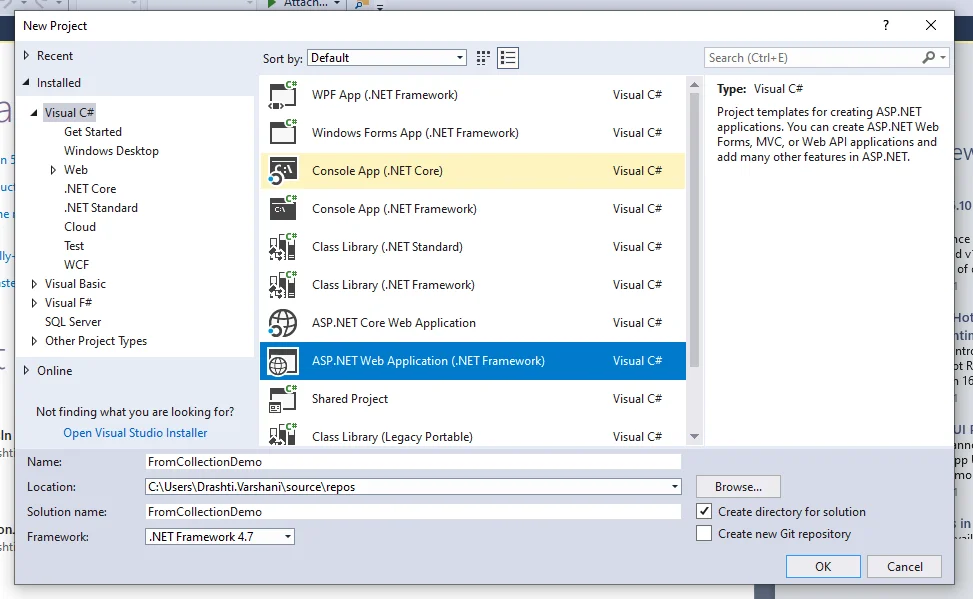
Open Visual Studio or any editor and create a new Asp.net Web Application (.NET Framework) application and provide the appropriate name.
ai-Hiring-banner


[Fig:- Create project]

STEP 2

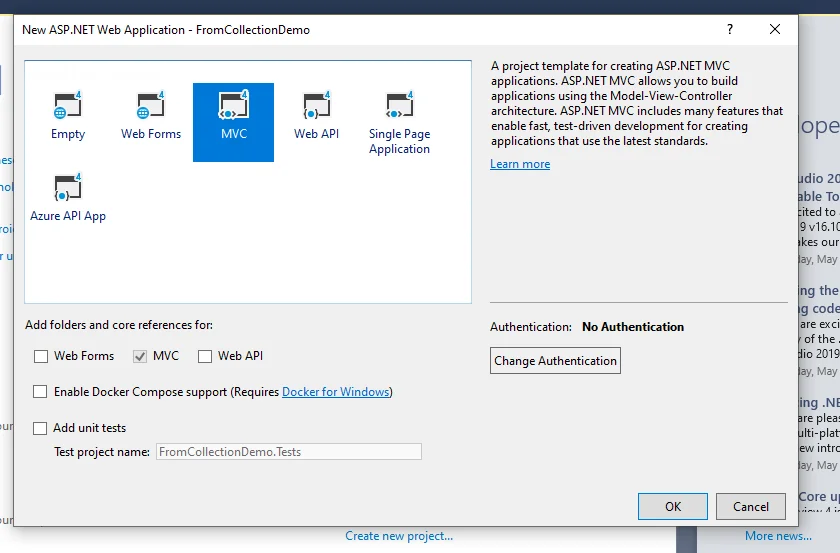
Select MVC Option or either use the Empty template as per your choice.
ai-Hiring-banner


[Fig:- MVC Application]

STEP 3

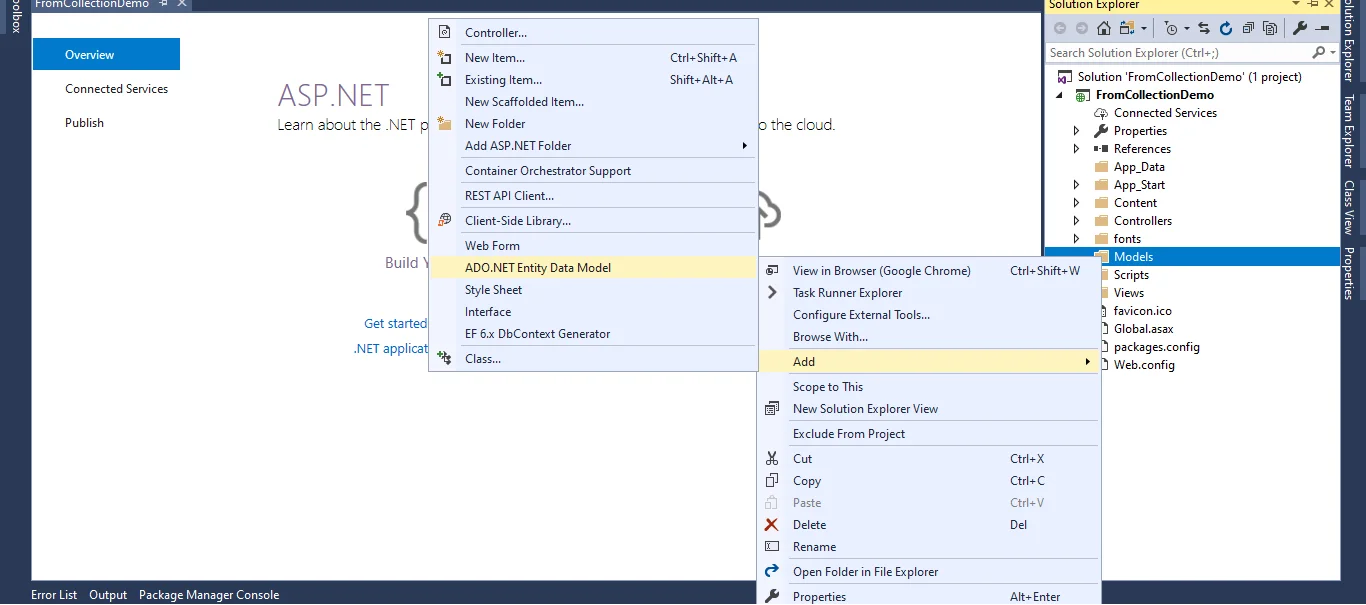
Now, we need to enter the data model into our application. Right-click on a model folder and then click Add. Select Ado.NET Entity Data Model. If the Data model does not show this way you can click on a new item and select ADO.NET Entity Data Model.
ai-Hiring-banner


[Fig:- ADO.NET Entity Data Model]

Give the name for the Entity model

ai-Hiring-banner


[Fig:- ADO.NET Entity Data Model Name]

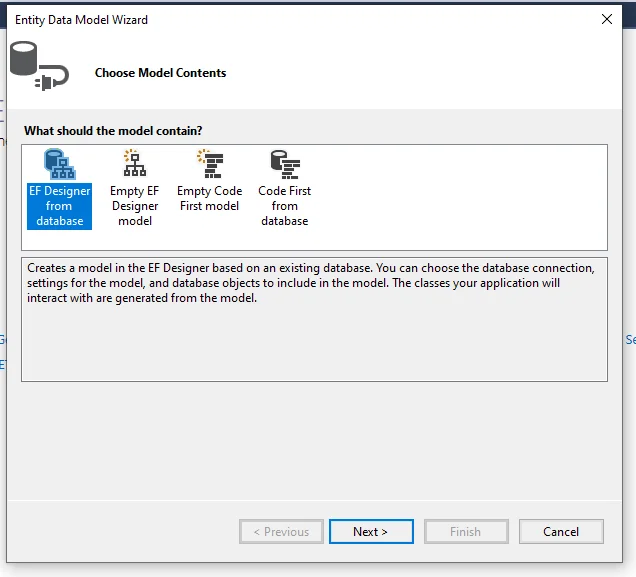
After Clicking OK. This wizard will open select EF Designer from Database. Here I will use the database first approach so I will choose EF Designer first model that you can use any model according to your need but the above step is different from code first and models first approach.

ai-Hiring-banner


[Fig:- EF Designer First model]

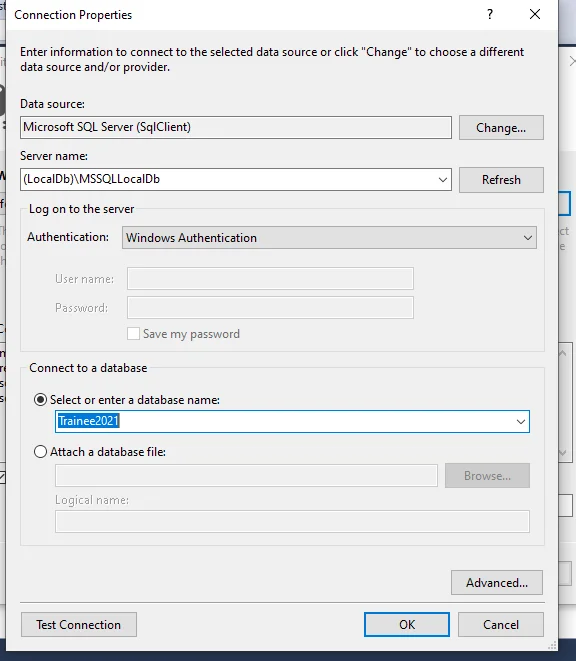
After clicking Next, a window will appear. Click New Connection. Another window will appear to add your server name and select your database and click OK.

ai-Hiring-banner


[Fig:- New Connection]

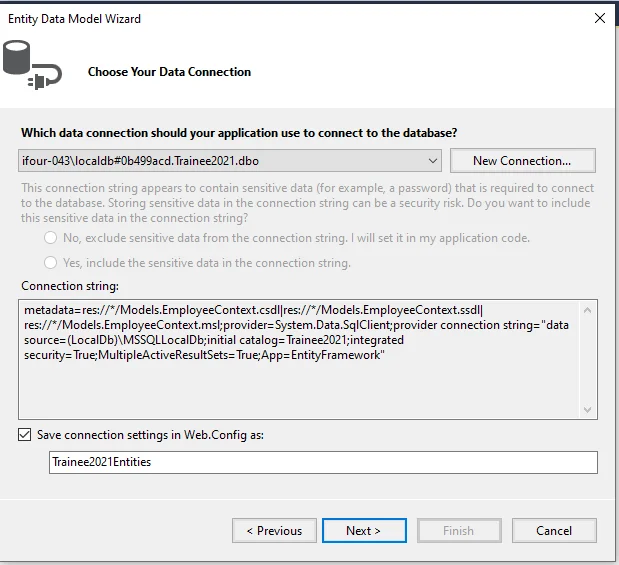
Now a new connection will be added. Click OK.

ai-Hiring-banner


[Fig:- New Connection string added ]

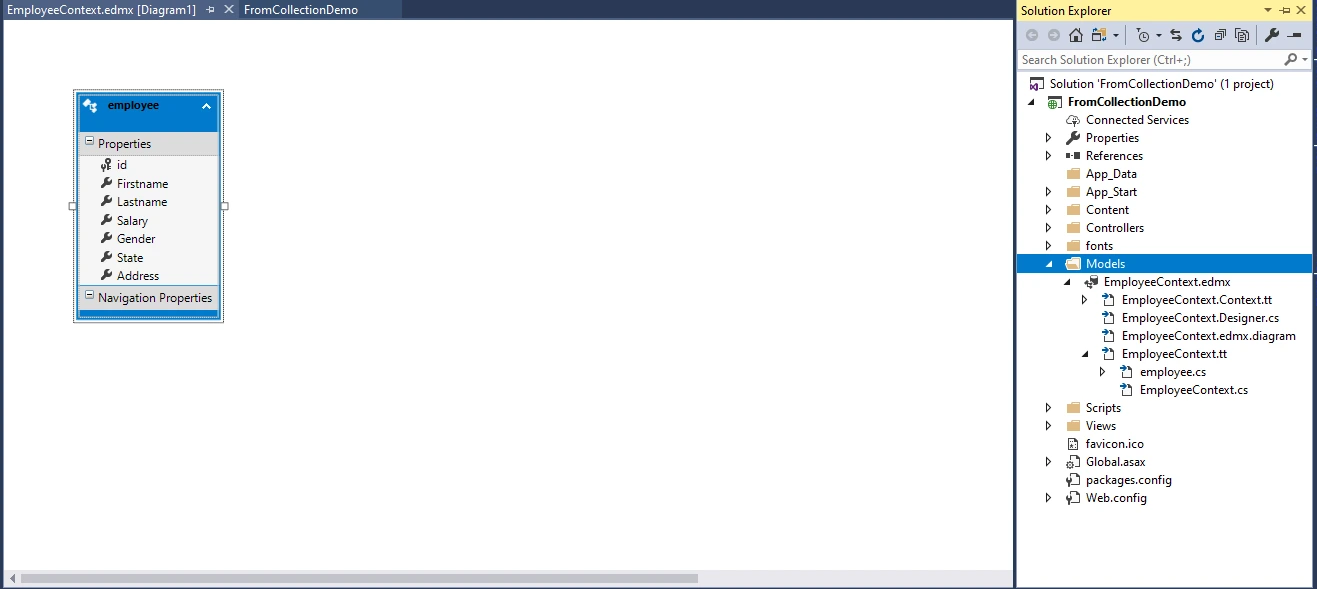
After clicking on Finish your table will be added and the following classes will be added to your model folder.

ai-Hiring-banner

[Fig:- Model folder]

STEP 4

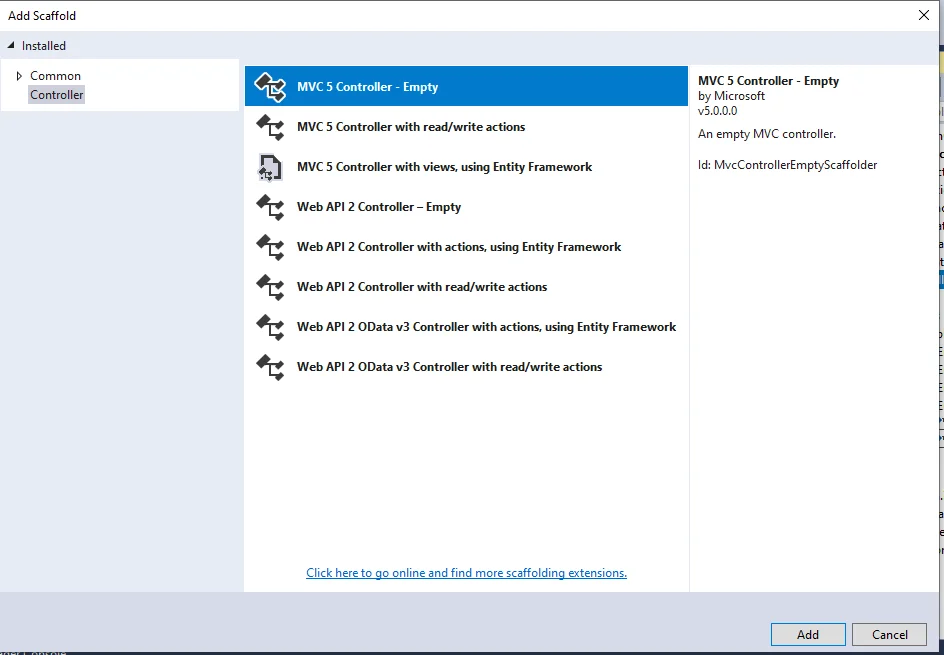
Now we need to add a controller. Right-click on the controller folder and select MVC Empty controller click on Add.

After clicking in Add, another window will appear. Provide the name of the controller and click Add. Your Controller will be added to the controller folder.

ai-Hiring-banner


[Fig:- MVC Empty Controller]

The form collection class automatically receives the form value in the controller action method in the form of key and value pair. Keys and value pairs can be accessed using a name or index.

We can use the loop to access each key and its value sent to the server. Let's add the following method.

    using System;
    using System.Collections.Generic;
    using System. Linq;
    using System. Web;
    using System.Web.Mvc;
    using FromCollectionDemo.Models;
    
    namespace FromCollectionDemo.Controllers
    {
        public class EmployeeController: Controller
        {
            Trainee2021Entities db = new Trainee2021Entities();
            // GET: Employee
            public ActionResult Index()
            {
                var employee = db.employees.ToList();
                return View(employee);
            }
            
            public ActionResult Create()
            {
                return View();
            }
    
            [HttpPost]
            [ValidateAntiForgeryToken]
            public ActionResult Create(FormCollection formCollection)
            {
                if (ModelState.IsValid)
                {
                    foreach (string key in formCollection.AllKeys)
                    {
                        Response.Write("Key=" + key + " ");
                        Response.Write("Value=" + formCollection[key]);
                        Response.Write("
    ");
                    }
                  
                }
                return View();
            }
        }
                      

Looking for Trusted .Net Development Company ? Your Search ends here.


If you run this code inside the EmployeeController you will get the following output on your screen.

ai-Hiring-banner


[Fig:- key Value pair]

The above code does not insert the data in the database it simply displays our data in key-value pair. But I want to enter data into the database so I want to change my code. Here is my full code for EmployeeController

EmployeeController
    using System;
    using System.Collections.Generic;
    using System. Linq;
    using System. Web;
    using System.Web.Mvc;
    using FromCollectionDemo.Models;
    
    namespace FromCollectionDemo.Controllers
    {
        public class EmployeeController: Controller
        {
            Trainee2021Entities db = new Trainee2021Entities();
            public ActionResult Index()
            {
                var employee = db.employees.ToList();
                return View(employee);
            }
            
            public ActionResult Create()
            {
                return View();
            }
    
            [HttpPost]
            [ValidateAntiForgeryToken]
            public ActionResult Create(FormCollection formCollection)
            {
                if (ModelState.IsValid)
                {
                    employee emp = new employee();
                    emp.Firstname = formCollection["Firstname"];
                    emp.Lastname = formCollection["Lastname"];
                    emp.Gender = formCollection["Gender"];
                    emp.Salary = Convert.ToInt32(formCollection["Salary"]);
                    emp.State = formCollection["State"];
                    emp.Address = formCollection["Address"];
                    db.employees.Add(emp);
                    db.SaveChanges();
                    return RedirectToAction("Index");
                }
                return View();
            }
        }
    }
                      
STEP 5

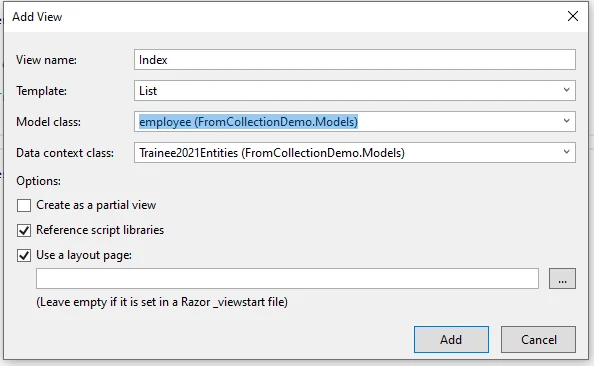
Right click on the Index method in Employee controller. Click on Add View the window will appear select List template and model class.

After clicking the Add. it will create an Index view page on the Index page where we get a list of records from the database.]

ai-Hiring-banner


[Fig:- Index view]

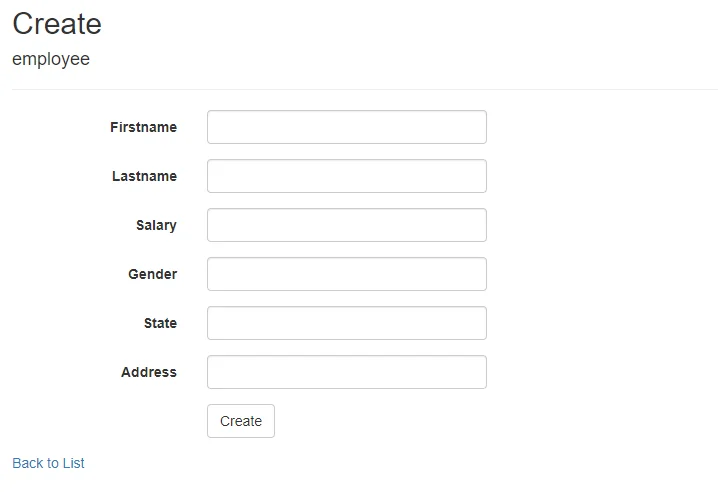
In the same way, we can create a view for Create method but we select Create Template it will generate the default code.

Run the Create. Cshtml, it gives the following output

ai-Hiring-banner


[Fig:- Create Page]

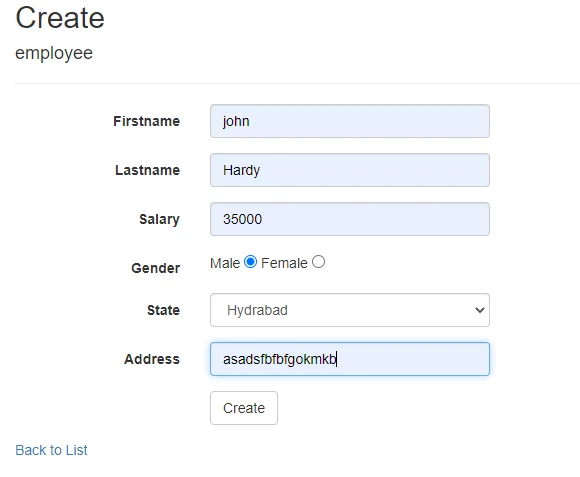
For Gender it has a radio button and also for State is ideal for a drop-down list instead of a text box. To achieve this functionality, I change my code. Here is my full code for Create View.

Now use the code and you will get the next result.

Create.cshtml
    
      @model FromCollectionDemo.Models.employee
                          
      @{
          ViewBag.Title = "Create";
      }

Create

@using (Html.BeginForm()) { @Html.AntiForgeryToken()

employee


@Html.LabelFor(model => model.Firstname, htmlAttributes: new { @class = "control-label col-md-2" })
@Html.EditorFor(model => model.Firstname, new { htmlAttributes = new { @class = "form-control" } })
@Html.LabelFor(model => model.Lastname, htmlAttributes: new { @class = "control-label col-md-2" })
@Html.EditorFor(model => model.Lastname, new { htmlAttributes = new { @class = "form-control" } })
@Html.LabelFor(model => model.Salary, htmlAttributes: new { @class = "control-label col-md-2" })
@Html.EditorFor(model => model.Salary, new { htmlAttributes = new { @class = "form-control" } })
@Html.LabelFor(model => model.Gender, htmlAttributes: new { @class = "control-label col-md-2" })
Male @Html.RadioButtonFor(model => model.Gender, "Male") Female @Html.RadioButtonFor(model => model.Gender, "Female")
@Html.LabelFor(model => model.State, htmlAttributes: new { @class = "control-label col-md-2" })
@Html.DropDownList("State" , new List { new SelectListItem{Text = "Gujarat" , Value="Gujarat"}, new SelectListItem { Text = "Mumbai" , Value ="Mumbai"}, new SelectListItem{ Text ="Delhi" ,Value = "Delhi"}, new SelectListItem{ Text ="Hydrabad" ,Value = "Hydrabad"} },"select State" ,new {@class ="form-control"})
@Html.LabelFor(model => model.Address, htmlAttributes: new { @class = "control-label col-md-2" })
@Html.EditorFor(model => model.Address, new { htmlAttributes = new { @class = "form-control" } })
}
@Html.ActionLink("Back to List", "Index")
@section Scripts { @Scripts.Render("~/bundles/jqueryval") }
 

Now run the code and you will get the following output.

ai-Hiring-banner


[Fig:- Create Page ]


ai-Hiring-banner


[Fig:- Index Page]

Conclusion


In this article, we have learned Form Collection automatically retrieves input element value from a controller action method. Use the form collection class to retrieve input element data.

What is Form Collection and how to implement it in ASP .NET MVC? Table of Content 1. What is Form Collection? 2. How to Implement form collection in ASP.NET MVC? 3. Conclusion What is Form Collection? Form collection is used to retrieve input elements from the controller action method. Form collection class automatically receives the data form value in controller methods in the form of key/value pair. Key and value pairs are accessed using the key name and index value. How to Implement form collection in ASP.NET MVC? Here in this article, I will show you how to use form collection and how we can use form collection class. Here I will create the view to enter data into a database table using the form collection class available in ASP.NET MVC. STEP 1 Open Visual Studio or any editor and create a new Asp.net Web Application (.NET Framework) application and provide the appropriate name.   [Fig:- Create project] STEP 2 Select MVC Option or either use the Empty template as per your choice.   [Fig:- MVC Application] STEP 3 Now, we need to enter the data model into our application. Right-click on a model folder and then click Add. Select Ado.NET Entity Data Model. If the Data model does not show this way you can click on a new item and select ADO.NET Entity Data Model.   [Fig:- ADO.NET Entity Data Model] Give the name for the Entity model   [Fig:- ADO.NET Entity Data Model Name] After Clicking OK. This wizard will open select EF Designer from Database. Here I will use the database first approach so I will choose EF Designer first model that you can use any model according to your need but the above step is different from code first and models first approach.   [Fig:- EF Designer First model] Read More: What Is Tempdata And How To Use In Mvc? After clicking Next, a window will appear. Click New Connection. Another window will appear to add your server name and select your database and click OK.   [Fig:- New Connection] Now a new connection will be added. Click OK.   [Fig:- New Connection string added ] After clicking on Finish your table will be added and the following classes will be added to your model folder. [Fig:- Model folder] STEP 4 Now we need to add a controller. Right-click on the controller folder and select MVC Empty controller click on Add. After clicking in Add, another window will appear. Provide the name of the controller and click Add. Your Controller will be added to the controller folder.   [Fig:- MVC Empty Controller] The form collection class automatically receives the form value in the controller action method in the form of key and value pair. Keys and value pairs can be accessed using a name or index. We can use the loop to access each key and its value sent to the server. Let's add the following method. using System; using System.Collections.Generic; using System. Linq; using System. Web; using System.Web.Mvc; using FromCollectionDemo.Models; namespace FromCollectionDemo.Controllers { public class EmployeeController: Controller { Trainee2021Entities db = new Trainee2021Entities(); // GET: Employee public ActionResult Index() { var employee = db.employees.ToList(); return View(employee); } public ActionResult Create() { return View(); } [HttpPost] [ValidateAntiForgeryToken] public ActionResult Create(FormCollection formCollection) { if (ModelState.IsValid) { foreach (string key in formCollection.AllKeys) { Response.Write("Key=" + key + " "); Response.Write("Value=" + formCollection[key]); Response.Write(" "); } } return View(); } } Looking for Trusted .Net Development Company ? Your Search ends here. See here   If you run this code inside the EmployeeController you will get the following output on your screen.   [Fig:- key Value pair] The above code does not insert the data in the database it simply displays our data in key-value pair. But I want to enter data into the database so I want to change my code. Here is my full code for EmployeeController EmployeeController using System; using System.Collections.Generic; using System. Linq; using System. Web; using System.Web.Mvc; using FromCollectionDemo.Models; namespace FromCollectionDemo.Controllers { public class EmployeeController: Controller { Trainee2021Entities db = new Trainee2021Entities(); public ActionResult Index() { var employee = db.employees.ToList(); return View(employee); } public ActionResult Create() { return View(); } [HttpPost] [ValidateAntiForgeryToken] public ActionResult Create(FormCollection formCollection) { if (ModelState.IsValid) { employee emp = new employee(); emp.Firstname = formCollection["Firstname"]; emp.Lastname = formCollection["Lastname"]; emp.Gender = formCollection["Gender"]; emp.Salary = Convert.ToInt32(formCollection["Salary"]); emp.State = formCollection["State"]; emp.Address = formCollection["Address"]; db.employees.Add(emp); db.SaveChanges(); return RedirectToAction("Index"); } return View(); } } } STEP 5 Right click on the Index method in Employee controller. Click on Add View the window will appear select List template and model class. After clicking the Add. it will create an Index view page on the Index page where we get a list of records from the database.]   [Fig:- Index view] In the same way, we can create a view for Create method but we select Create Template it will generate the default code. Run the Create. Cshtml, it gives the following output   [Fig:- Create Page] For Gender it has a radio button and also for State is ideal for a drop-down list instead of a text box. To achieve this functionality, I change my code. Here is my full code for Create View. Now use the code and you will get the next result. Create.cshtml @model FromCollectionDemo.Models.employee @{ ViewBag.Title = "Create"; }Create @using (Html.BeginForm()) { @Html.AntiForgeryToken() employee @Html.LabelFor(model => model.Firstname, htmlAttributes: new { @class = "control-label col-md-2" })@Html.EditorFor(model => model.Firstname, new { htmlAttributes = new { @class = "form-control" } }) @Html.LabelFor(model => model.Lastname, htmlAttributes: new { @class = "control-label col-md-2" })@Html.EditorFor(model => model.Lastname, new { htmlAttributes = new { @class = "form-control" } }) @Html.LabelFor(model => model.Salary, htmlAttributes: new { @class = "control-label col-md-2" })@Html.EditorFor(model => model.Salary, new { htmlAttributes = new { @class = "form-control" } }) @Html.LabelFor(model => model.Gender, htmlAttributes: new { @class = "control-label col-md-2" })Male @Html.RadioButtonFor(model => model.Gender, "Male") Female @Html.RadioButtonFor(model => model.Gender, "Female") @Html.LabelFor(model => model.State, htmlAttributes: new { @class = "control-label col-md-2" })@Html.DropDownList("State" , new List { new SelectListItem{Text = "Gujarat" , Value="Gujarat"}, new SelectListItem { Text = "Mumbai" , Value ="Mumbai"}, new SelectListItem{ Text ="Delhi" ,Value = "Delhi"}, new SelectListItem{ Text ="Hydrabad" ,Value = "Hydrabad"} },"select State" ,new {@class ="form-control"}) @Html.LabelFor(model => model.Address, htmlAttributes: new { @class = "control-label col-md-2" })@Html.EditorFor(model => model.Address, new { htmlAttributes = new { @class = "form-control" } }) } @Html.ActionLink("Back to List", "Index") @section Scripts { @Scripts.Render("~/bundles/jqueryval") }   Now run the code and you will get the following output.   [Fig:- Create Page ]     [Fig:- Index Page] Conclusion In this article, we have learned Form Collection automatically retrieves input element value from a controller action method. Use the form collection class to retrieve input element data.
Build Your Agile Team

Enter your e-mail address Please enter valid e-mail

Categories

Ensure your sustainable growth with our team

Talk to our experts
Sustainable
Sustainable
 

Blog Our insights

Power Apps vs Power Automate: When to Use What?

I often see people asking questions like “Is Power App the same as Power Automate?”. “Are they interchangeable or have their own purpose?”. We first need to clear up this confusion...

Azure DevOps Pipeline Deployment for Competitive Business: The Winning Formula

We always hear about how important it is to be competitive and stand out in the market. But as an entrepreneur, how would you truly set your business apart? Is there any way to do...

React 18 Vs React 19: Key Differences To Know For 2024

Ever wondered how a simple technology can spark a revolution in the IT business? Just look at React.js - a leading Front-end JS library released in 2013, has made it possible. Praised for its seamless features, React.js has altered the way of bespoke app development with its latest versions released periodically. React.js is known for building interactive user interfaces and has been evolving rapidly to meet the demands of modern web development. Thus, businesses lean to hire dedicated React.js developers for their projects. React.js 19 is the latest version released and people are loving its amazing features impelling them for its adoption.