×

iFour Logo

Ultimate guide for implementing Repository pattern and Unit of work for .NET core

Kapil Panchal - October 15, 2020

Listening is fun too.

Straighten your back and cherish with coffee - PLAY !

  • play
  • pause
  • pause
Ultimate guide for implementing Repository pattern and Unit of work for .NET core

The repository and unit of work patterns are deliberated to generate alayer between the data access layer and the business logic layer of any application. Executing these patterns can assistwrapping of your application from changes in the data store and can accelerate automated unit testing or test-driven development (TDD).

What is the Repository pattern?


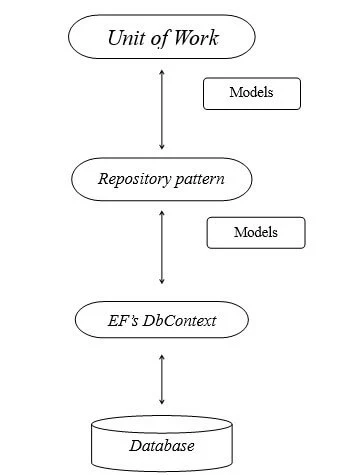
The Repository pattern is used to separates the data access layer and business logic in your application. It creates the abstraction layer between data access layer and business logic layer of your application.

The repository offers a collection of an interface by providing methods to add,modify, remove, and fetch domain objects.

Assume that there is the data logic on the context which is used by the three controllers so for that you have to write the same logic three times at different places.

This problem will be solved by the repository pattern. It provides the codere-usability, maintainability, and scalability.

What is Unit of Work pattern?


When there are multiple repositories that need to be invoked or process for a single request which shares a common context for that we need to implement the Unit of Work.

We can implement the repository effectively with the help of the unit of work.

When a set of databases commit operations in that case we cannot just go and call the SaveChanges() method every time. For that, we are going tocluster the related repository into a single unit call Unit of Work.

Repository and Unit of Work pattern design


diagram

Advantages

  • Repository centralize your data logic and service logic.
  • Reduce the code, provides flexibility architecture.
  • Unit of Work provides the effective implementation of repositories. And Unit of Work is a cluster of the repositories.


Example

For example, there is a customer repository and a customer repositoryinterface.

 
namespace WebApplication16.Repository
{
interfaceICustomerRepo
{
//definition of your method
}
}
					

This is the customer repository interface. Declare your method here and implement that method in repository.

 
namespace WebApplication16.Repository
{  
publicclassCustomerRepo : ICustomerRepo
{          
DbContext context;
public CustomerRepo(DbContext ctx)
{
 this.context = ctx;
}  
}
}
			  

This is the customer repository that implements the method from ICustomerRepo.
These repository work on their dbcontext instance that is used to perform the operations onto the database using Entity Framework Core.

So, we use the Unit of Work pattern to group the all common (CRUD) operations like create, retrieve, update, and delete and place it in the generic repository.

In IRepo, we can declare two method for add and remove as shown below.

 
Step 1: - Create generic repository interface
 
namespace WebApplication16.Repository
{
interfaceIRepowhere T : class
{
void Add(T entity);
void Delete(T entity);        
}
}
		       

We have defined two method Add and Delete in IRepo and implement them in Repository named Repo as shown below.

 
Step 2: - Create generic repository
 
namespace WebApplication16.Repository
{
publicclassRepo : IRepowhere T : class
{
protectedreadonly DbSet _context;
public Repo(DbContext context)
{
  _context = context.Set();
}
publicvoid Add(T entity)
{
 _context.Add(entity);
}
publicvoid Delete(T entity)
{
_context.Remove(entity);
}        
}
}
			  

IRepo accept the generic type reference T of class type and implement that method in repository and works on context passed on to it.

The entity set is created using context.set() method which returns the specific dbset.

Now make use of these Interface repositories to link with customer repository as shown below.

 
Step 3: - Create customer repository interface
 
namespace WebApplication16.Repository
{
interfaceICustomerRepo : IRepo
{
//declare your methods
}
}
			  

ICustomerRepo repository interface inherits the IRepo.

 
Step 4: - Create customer repository
 
namespace WebApplication16.Repository
{
publicclassCustomerRepo : Repo, ICustomerRepo
{
publicCustomerRepo(Context ctx) : base(ctx)       
{
					  
  
}        
}
}
			  

Now CustomerRepo class from Repo with their type reference Customer.

We have passed the context in the constructor which is derived from the baseconstructor.

Create the Unit of Work class to group all repositories.

 
Step 5: - Create Unit of Work Interface
 
 namespace WebApplication16.Repository
{
interfaceIUoW : IDisposable
{
ICustomerRepo CustomerRepo {get;}
intCommit ();
}
}
				

We can create the IUoW interface which extends the IDisposable interface that provides a mechanism for releasing unmanaged resources.

 
Step 6: - Create Unit of Work Class
 
namespace WebApplication16.Repository
{
publicclassUow : IUoW
{
privatereadonly Context _context;
private IRepo customer;
public Uow(Context context)
{
this._context = context;            
}
public ICustomerRepo CustomerRepo
{
get
{
returnnew CustomerRepo(_context);
}
}
publicint Commit()
{
return _context.SaveChanges();
}
publicvoid Dispose()
{
Dispose(true);
GC.SuppressFinalize(this);
}
				
 
protectedvirtualvoid Dispose(bool disposing)
{
if (disposing)
{
 _context.Dispose();
}
}
}
}


Unit of Work class (Uow) extends the unit of work interface (IUoW). Which has a commit method and one property.

We have passed the context in the Uow constructor that invokes the commit method in which respective operations will be saved into the database.

Now create the controller which uses the Unit of Work interface and perform the operations on database.

Planning to Hire Dedicated ASP.Net Core Developer ? Your Search ends here.

 
Step 7: - Create Constructor
 
namespace WebApplication16.Controllers
{
[Route("api/[controller]")]
[ApiController]
publicclassCustomerController : ControllerBase
{
private IUoW _unitOfWork;
public CustomerController(IUoW unitOfWork)
{
_unitOfWork = unitOfWork;
}
[HttpGet]
public IEnumerable Get()
{
return _unitOfWork.CustomerRepo.GetAll();
}        
[HttpGet("{id}")]
public Customer Get(int id)
{
return _unitOfWork.CustomerRepo.GetCustomerById(id);
}
[HttpPost]
{
var customer = new Customer
{
Id = 1,FirstName = "Raj",LastName = "Patel", Age = 22
} ;            
_unitOfWork.CustomerRepo.Add(customer);
_unitOfWork.Commit();
return Ok();
            
}
}
				 

We have created the customer controller that extends controller base.

In the customer controller constructor pass the Unit of Work interface instance. Now Define your method to get, add, and delete method from the repository.

In this way, we can create the simple Unit of Work pattern for our application which helps us to improve the database transaction time.

Conclusion


In this blog, we have depicted how to implement the repository and Unit of Work pattern. Implementing both patterns can increase the testability, maintainability, and flexibility in architecture. Hope you understand it briefly.

Ultimate guide for implementing Repository pattern and Unit of work for .NET core The repository and unit of work patterns are deliberated to generate alayer between the data access layer and the business logic layer of any application. Executing these patterns can assistwrapping of your application from changes in the data store and can accelerate automated unit testing or test-driven development (TDD). What is the Repository pattern? The Repository pattern is used to separates the data access layer and business logic in your application. It creates the abstraction layer between data access layer and business logic layer of your application. The repository offers a collection of an interface by providing methods to add,modify, remove, and fetch domain objects. Assume that there is the data logic on the context which is used by the three controllers so for that you have to write the same logic three times at different places. This problem will be solved by the repository pattern. It provides the codere-usability, maintainability, and scalability. What is Unit of Work pattern? When there are multiple repositories that need to be invoked or process for a single request which shares a common context for that we need to implement the Unit of Work. We can implement the repository effectively with the help of the unit of work. When a set of databases commit operations in that case we cannot just go and call the SaveChanges() method every time. For that, we are going tocluster the related repository into a single unit call Unit of Work. Repository and Unit of Work pattern design Advantages Repository centralize your data logic and service logic. Reduce the code, provides flexibility architecture. Unit of Work provides the effective implementation of repositories. And Unit of Work is a cluster of the repositories. Read More: 13 Important .net Core Libraries That Every .net Core Developer Should Know   Example For example, there is a customer repository and a customer repositoryinterface.   namespace WebApplication16.Repository { interfaceICustomerRepo { //definition of your method } } This is the customer repository interface. Declare your method here and implement that method in repository.   namespace WebApplication16.Repository { publicclassCustomerRepo : ICustomerRepo { DbContext context; public CustomerRepo(DbContext ctx) { this.context = ctx; } } } This is the customer repository that implements the method from ICustomerRepo. These repository work on their dbcontext instance that is used to perform the operations onto the database using Entity Framework Core. So, we use the Unit of Work pattern to group the all common (CRUD) operations like create, retrieve, update, and delete and place it in the generic repository. In IRepo, we can declare two method for add and remove as shown below.   Step 1: - Create generic repository interface   namespace WebApplication16.Repository { interfaceIRepowhere T : class { void Add(T entity); void Delete(T entity); } } We have defined two method Add and Delete in IRepo and implement them in Repository named Repo as shown below.   Step 2: - Create generic repository   namespace WebApplication16.Repository { publicclassRepo : IRepowhere T : class { protectedreadonly DbSet _context; public Repo(DbContext context) { _context = context.Set(); } publicvoid Add(T entity) { _context.Add(entity); } publicvoid Delete(T entity) { _context.Remove(entity); } } } IRepo accept the generic type reference T of class type and implement that method in repository and works on context passed on to it. The entity set is created using context.set() method which returns the specific dbset. Now make use of these Interface repositories to link with customer repository as shown below.   Step 3: - Create customer repository interface   namespace WebApplication16.Repository { interfaceICustomerRepo : IRepo { //declare your methods } } ICustomerRepo repository interface inherits the IRepo.   Step 4: - Create customer repository   namespace WebApplication16.Repository { publicclassCustomerRepo : Repo, ICustomerRepo { publicCustomerRepo(Context ctx) : base(ctx) { } } } Now CustomerRepo class from Repo with their type reference Customer. We have passed the context in the constructor which is derived from the baseconstructor. Create the Unit of Work class to group all repositories.   Step 5: - Create Unit of Work Interface   namespace WebApplication16.Repository { interfaceIUoW : IDisposable { ICustomerRepo CustomerRepo {get;} intCommit (); } } We can create the IUoW interface which extends the IDisposable interface that provides a mechanism for releasing unmanaged resources.   Step 6: - Create Unit of Work Class   namespace WebApplication16.Repository { publicclassUow : IUoW { privatereadonly Context _context; private IRepo customer; public Uow(Context context) { this._context = context; } public ICustomerRepo CustomerRepo { get { returnnew CustomerRepo(_context); } } publicint Commit() { return _context.SaveChanges(); } publicvoid Dispose() { Dispose(true); GC.SuppressFinalize(this); }   protectedvirtualvoid Dispose(bool disposing) { if (disposing) { _context.Dispose(); } } } } Unit of Work class (Uow) extends the unit of work interface (IUoW). Which has a commit method and one property. We have passed the context in the Uow constructor that invokes the commit method in which respective operations will be saved into the database. Now create the controller which uses the Unit of Work interface and perform the operations on database. Planning to Hire Dedicated ASP.Net Core Developer ? Your Search ends here. See here   Step 7: - Create Constructor   namespace WebApplication16.Controllers { [Route("api/[controller]")] [ApiController] publicclassCustomerController : ControllerBase { private IUoW _unitOfWork; public CustomerController(IUoW unitOfWork) { _unitOfWork = unitOfWork; } [HttpGet] public IEnumerable Get() { return _unitOfWork.CustomerRepo.GetAll(); } [HttpGet("{id}")] public Customer Get(int id) { return _unitOfWork.CustomerRepo.GetCustomerById(id); } [HttpPost] { var customer = new Customer { Id = 1,FirstName = "Raj",LastName = "Patel", Age = 22 } ; _unitOfWork.CustomerRepo.Add(customer); _unitOfWork.Commit(); return Ok(); } } We have created the customer controller that extends controller base. In the customer controller constructor pass the Unit of Work interface instance. Now Define your method to get, add, and delete method from the repository. In this way, we can create the simple Unit of Work pattern for our application which helps us to improve the database transaction time. Conclusion In this blog, we have depicted how to implement the repository and Unit of Work pattern. Implementing both patterns can increase the testability, maintainability, and flexibility in architecture. Hope you understand it briefly.
Kapil Panchal

Kapil Panchal

A passionate Technical writer and an SEO freak working as a Content Development Manager at iFour Technolab, USA. With extensive experience in IT, Services, and Product sectors, I relish writing about technology and love sharing exceptional insights on various platforms. I believe in constant learning and am passionate about being better every day.

Build Your Agile Team

Enter your e-mail address Please enter valid e-mail

Categories

Ensure your sustainable growth with our team

Talk to our experts
Sustainable
Sustainable
 
Blog Our insights
Power Apps Solving 13 Legal Challenges

There is a common misconception that bringing technology into the legal field won't be effective as this profession relies heavily on evidence and facts. However, if you look at it...

How to Automate Power BI Reports Using Power Automate

"Does Power Automate work with Power BI?”. If you think the same, you’re at the right place. Manual reporting plays an important role in business decision-making but requires more...

What’s New in .NET 9?

Today, we’re thrilled to present you with the first glimpse of .NET 9 release and let you know what features and updates you can anticipate in this new version. Various professionals believe that it’s the right time to explore and adopt the latest version of .NET for your upcoming projects. It is even recommended for projects built using .NET 6 or .NET 8, due to the framework updates made in this version.